

Today we look into one of the most critical yet often overlooked topics in FPGA design – Static Timing Analysis (STA). Understanding STA is key to ensuring that your digital design works not only functionally but also reliably at speed. To ground this theoretical topic, students also completed Lab 5, where they compared pipelined and non-pipelined multipliers and analyzed timing and performance parameters.
What Is Static Timing Analysis?
Static Timing Analysis is a method used to determine if a digital circuit will operate correctly at the target clock frequency without needing simulation input vectors. It uses timing constraints and logic paths to compute:
-
Setup time
-
Hold time
-
Propagation delay
-
Rise and fall times
-
Clock skew
-
Critical path delay
-
Maximum clock frequency
The goal is to verify that all data signals arrive where they need to, on time, under worst-case conditions.
Key Timing Parameters Explained
To help visualize the concept, we used a simple design involving two D Flip-Flops (FF1 and FF2) connected through a combinational logic block composed of two logic gates.
1. Setup Time
This is the minimum time the data must be stable before the clock edge arrives at FF2. If violated, data may not be correctly latched.
2. Hold Time
The data must remain stable after the clock edge. If violated, metastability may occur.
3. Propagation Delay
This is the time taken for the signal to travel through the logic gates between FF1 and FF2. It’s dependent on the type and number of gates.
4. Rising/Falling Time
The transition period from low to high or high to low in the signal waveform. Faster transitions are better for minimizing timing uncertainty.
5. Clock Skew
This occurs when the clock arrives at FF1 and FF2 at slightly different times. Clock skew can reduce the effective timing margin.
Example in Class Two Flip-Flops and Logic Path
Imagine a logic path between FF1 (source) and FF2 (destination)
Let’s assume-

-
Propagation delay through AND = 2ns
-
Propagation delay through OR = 3ns
-
Setup time of FF2 = 1ns
-
Clock skew = 0.5ns
Then, the total delay from FF1 to FF2 is –
To meet setup time, the clock period must be at least:
This gives a maximum clock frequency of:
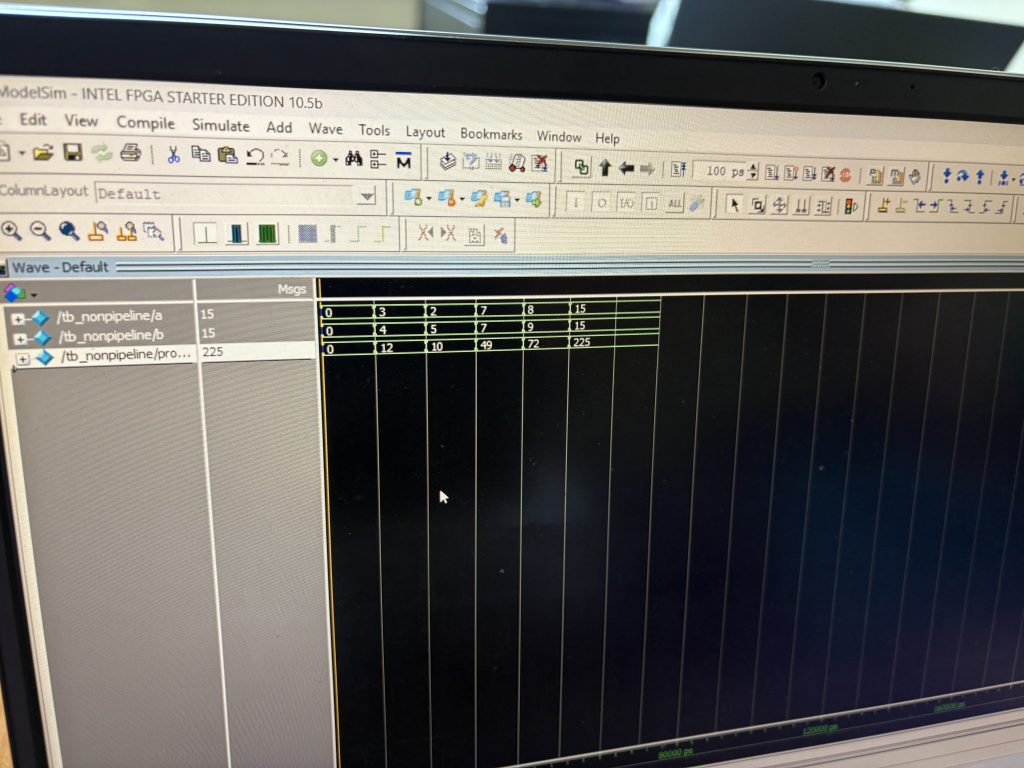
Lab 5 – Pipelining vs Non-Pipelining in Multiplier Design
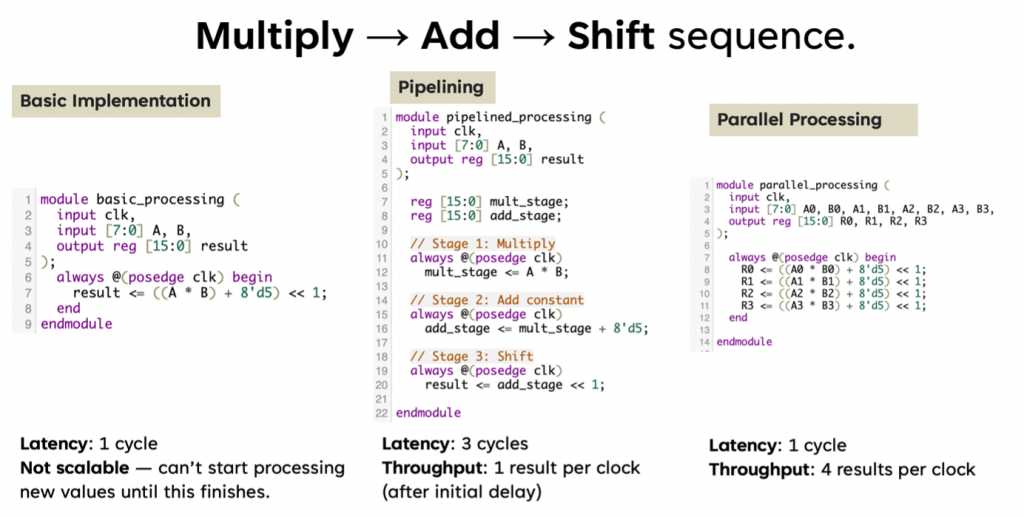
In Lab 5, students implemented and tested two versions of a multiplier:
-
Non-Pipelined Multiplier – Straightforward, all computation happens in one clock cycle.
-
Pipelined Multiplier – Operation split into multiple stages with registers (flip-flops) in between.
They then analyzed the following performance metrics – (hypothetically =))
| Parameter | Non-Pipelined | Pipelined |
|---|---|---|
| Critical Path Delay | Higher | Lower |
| Max Clock Frequency | Lower | Higher |
| FPGA Logic Utilization | Lower | Higher |
| Throughput | Lower | Higher (1 output per cycle after latency) |

Key Takeaways from the Lab
-
Pipelining reduces the critical path delay, allowing the design to run at a much higher clock frequency.
-
While pipelining increases the logic utilization (more flip-flops), the throughput improves significantly, making it ideal for high-speed applications like real-time data processing in picosatellites or image processing.
-
Static timing analysis helps quantify the improvements, giving insight into real performance beyond just functional correctness.
See you next week for your FPGA project development =)